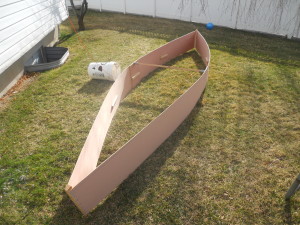
I made a little more progress on the Lazy Weekend canoe this weekend. I only had about an hour to spend on it, but I got in the rest of the cleats for the seats, and I managed to attached the stems.

The resulting structure is very floppy and unstable. It took three of us to move it so that it wouldn’t break. I am pretty sure that adding the chines will stiffen it up substantially.
I have skipped putting in the center frame. I have the frame pieces cut, but I just couldn’t come up with a way to install them that wouldn’t be ridiculously fragile. So instead I have decided to install the chine logs and then see about getting the measurements across the center to match. I should be able to pull the chine logs together and push the gunnels out to the right spot, and then plane the bottom of the boat flush so that I can put the bottom on. Once the bottom is on then that should pretty much lock in the shape of the boat.
Once the bottom is on then I will fit the seats, that should really lock in the shape of the boat. Then it is just a question of making the gunnels fit to the resulting curve.
Fitting the stem and stern pieces were relatively easy. I lifted the boat up on a table and saw horse, but looking back it probably would have been easier to simply leave the boat on the ground. I dry fit the stem piece on each side with a pair of screws at the top and bottom. I then removed the screws and and buttered up the side of the stem or stern piece with Titebond II wood glue. I then screwed the piece back to the side of the boat, and added more screws so that I got good squeeze out along the length of the piece.

I then did the same thing on the other side. I really like using these wide headed screws for this sort of application. They are #8 3/4 inch Teks “Lath” screws. I don’t think that the ones that I am using are self-tapping (I definitely pre-drilled the holes), but you can get self-tapping ones. The screws leave a very minimal mark, and they allow you to apply quite a bit of pressure. I will later remove the screws and drive bamboo skewers covered in Titebond II into the hole left behind. This worked really well at attaching the bottom of my PDR.

I am still impressed with how easy this particular build is turning out to be. The most difficult part was cutting out the gunnels and chines and if I would have had access to a table saw then these pieces would have been ridiculously easy to make. The stem and stern pieces also could have been cut out on a table saw in minutes instead of hand carved in three quarters of an hour.
If we decide to build more of these canoes then I will get some help pre-milling the lumber, and we will pre-cut (and pre-mark) the plywood. Then the boys will only have to assemble the boats. That should be ridiculously easy.